This is how I did my Halo Projector Retrofit for my FJ. You can buy kits such as from theretrofitsource.com and pay $500, or you can do it for around $150 by yourself and actually have an end result that looks way better - not to mention learning more about your car in the process.
This is what my end result looked like:

If this looks interesting to you, then what the fuck are you waiting for lets get going
EVERYTHING you will need:
1. Amazon.com Halo Projector Kit available here: http://amzn.to/1wJGk61
If the link stops working, go to amazon.com and type in "Nilight Halo" and you will find it.
When ordering this kit, MAKE SURE you contact the seller and specify:
INSIDE HALO COLOR
OUTSIDE HALO COLOR
XENON COLOR TEMP
Make it really fucking obvious.. we aren't dealing with the brightest people.
2. A wrench or some chunky pliers
3. 6-8 feet of 18G wire and wire cutting tool/electrical tape/shrinkwrap/conduit
4. a mini fuse tap to tap into drivers side fuse panel
5. very light sand paper
6. matte black paint or gritty bedliner (not the rubbery one)
*5 and 6 are only needed if you want to paint the inside of the housings black
7. phillips screwdriver
8. knife/flathead screwdriver
9. 6 pack of your favorite lager
10. Shot of favorite liquor (only needed conditionally in step 2)
Pretty sure thats everything...
Lets get cracking
PRE STEPS!
1. Make sure the halos work and are the right colors that you ordered. I connected 8 AA batteries in a line and touched the halo inverters (little black boxes) to make the halos light up to ensure proper colors. Do this now before you start installing then realize later. Remember, you ordered from Chinese people in China... (not being racist just saying...)

Step 1 - Remove headlights from FJ
This step requires removing the front grill and the two little panel pieces just below the lights. For this you will need your phillips screwdriver, a knife to pry up the panel/plugs, or a 10mm socket. The headlights are attached to the corner lights, so just remove both assemblies and we can separate them later.

Once separated, there are 2 small screws on the back of each headlight and keep the lenses tight. Take those out. Next, heat up your oven to 210F. This is the temperature I used. Once hot, put in 1 of the headlights for about 5 minutes. Dont worry the only thing you will melt is the glue, and even the glue will only soften. After 5-6 minutes, remove right away, and with a strong knife or a flathead screwdriver, pry the housings apart. If you take too long, you might want to put it back in the oven for 1 or 2 minutes. Take your time. They will be hard to separate. Just steady pressure on different parts.
Once both are separated, place the lenses out of the way to keep them clean. Have a beer.
2. Painting the reflectors.
This step is only needed if you want to blackout the housings. After blacking out, mine looked like this.

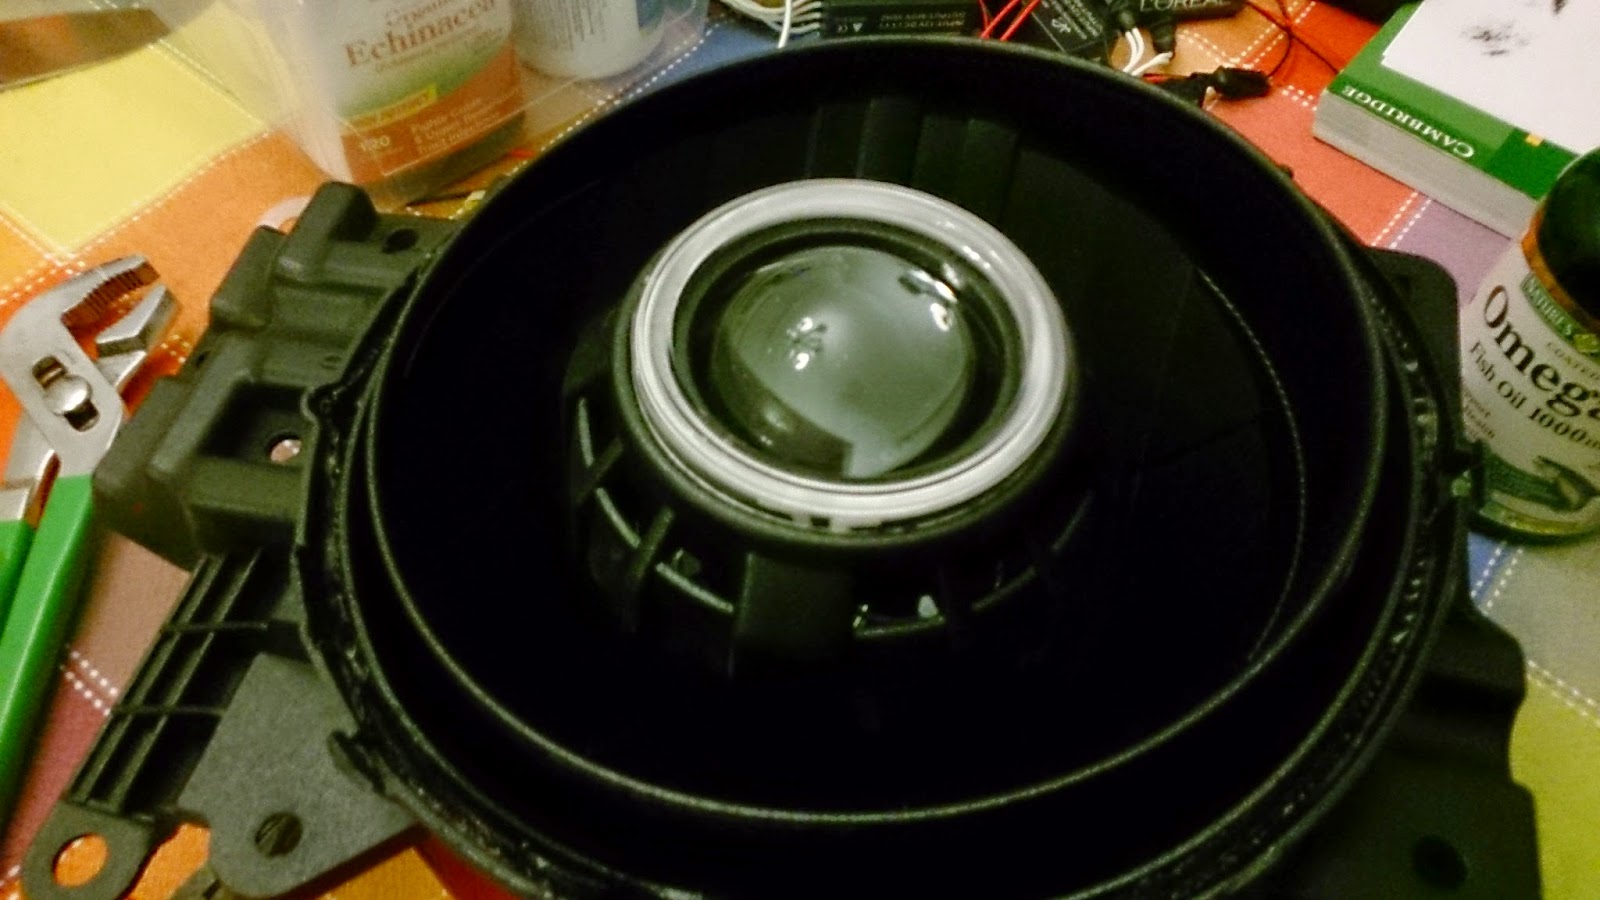
Lets start with the projectors. They will arrive to you totally assembled for you already. In order to paint them, take a phillips screwdriver and remove all the screws you can find, CAREFULLY taking apart the pieces. Its not hard, but be gentle. The CCFL bulbs can break if you put pressure on them. There are 2 CCFL bulbs, and inner and an outer. Remove them all CAREFULLY AS FUCK. Set aside the pieces. Have a beer.
This will require you to use a knife to pry up the plastic ring lens thingy for the small, inner halo. The large halo is removed through the back by removing 2 screws. These are little glass bulbs, so be careful as fuck.
If you fuck up. Don't worry... Just kidding. You should cry a little. You can get replacement CCFL bulbs on eBay (tho a month of shipping from China will be your punishment, haha! (sorry)). The inside bulbs are 70mm and the outside bulbs are 90mm. Search something like "CCFL halo 90mm" and it should come up. Find one with the exact photo of the one you broke. Take a shot of favorite liquor. Cry into empty glass.
Take the light sand paper and sand both the projector and the FJ housing. Try to get into the corners so that the paint will have an easier time sticking to the chromed plastic.
Next, place in an area thats above freezing (now is winter here) and throw down very light coats of paint, waiting 10 min or so between the coats. For some reason, it runs really easy on these. I put just enough paint to cover all the chrome. After the pain dries, it will contract a bit in places, so a final coat after drying for a while might be needed. Examine carefully - once they are sealed up again, it won't be fun to see a bit of chrome sticking out. Have a beer.


I used some gritty bedliner that I got from Home Depot for the rough look, which I think looks good. You can use matte black paint as well. I would shy away from the shiny stuff. Even the bedliner has a bit of shine. Let dry for a day before next step. Once dry, reassemble the projectors CAREFULLY AS FUCK!
3. Inserting Projectors into Housings
Now it is time to put the projectors into the FJ housings. This takes some care. The projectors are meant to screw in as if a lightbulb. In a little plastic bag there are some metal fittings. Use the one with 3-points sticking out that matches up to the H4 bulb design that the FJ usually uses. We will also need the rubber washer that it comes with. Start by unscrewing the 3 mini screws on the back of the projector and removing that metal ring thingy. We will replace it later Do the same as described below to each side.
In order of layers, place:
Projector | thick rubber washer | FJ housing | 3-point metal H4 washer | large screw nut to tighten everything up.
Lets describe this layer by layer now. The rubber washer fits against the housing to prevent vibrations and to stop it from moving around once you seal everything up. I cut a little groove in the washer at the bottom to feed the wires through. I kept the wires along the bottom side of the projector. This rubber washer goes between the Projector and the FJ housing. Optionally, you can put something like gorilla glue in between to seal it up. Not needed. I held the projector in my hand, upsidedown, placed the washer on top, then fed the wires through the FJ housing hole and then put the FJ housing on next. then comes the 3-point H4 washer. This will keep the project in the right position in the FJ housing. It almost makes the projector act like a bulb. The 3-point H4 washer fits perfectly into the grooves in the FJ housing. Next comes the nut to tighten everything. Use the pliers or wrench and tighten this really good, making sure the 3-point H4 washer stays in the grooves. Tighten it really good. Wiggle the housing, then tighten some more. Re-screw on the 3 little screws and the metal ring thingy. This thingy will hold the bulb in place later.
Now that the housings are done, before sealing them up, we want to make sure both projectors are parallel.
Take the large black wiring harness, and the two headlights (minus the FJ Lenses) and go out to the FJ, put the housings back into place, and do a mock up of the wiring. Connect the bulbs, ballasts, etc.
We want to turn on both headlights and compare the beams. We may need to rotate one side or the other slightly so that they will produce a single or double, nice cutoff at the end. Just make sure both sides are parallel to each other and to the ground


The wiring harness is pretty self explanatory. red is +, black is -. The ballasts and bulbs have unique connectors so its all pretty easy. NO relays or anything that is not in the kit is needed. Only the drivers side headlight connector is used to control the setup, since the main power is drawn directly from the battery. Just place the FJ, in front of and perpendicular to a flat wall. turn on beams and use your hands to cover and rotate each beam to compare and make them parallel to ground. Don't worry about beam height now. We do that later. Once both beams are parallel (even if they are not both at the same height), bring them back inside.
4. Put Lenses Back into Housings
Remove bulb from the projectors and keep safe. Try not to touch xenon bulbs as oil and dirt from fingers decreases lifespan.
Now is a good chance to clean FJ housing lenses in case they are dirty. Use something streak free like Windex. Use a towel that wont leave fibers. Microfiber cloth works great.
Place the FJ housings and the lenses back into the over for 5-6 minutes. Remove. Push together and replace 2 little screws in the back. Do 1 set at a time. Let cool. Have a beer. The hard shit is over and you survived.
5. Replace Housings and Wiring.
This is the more fun part. Replace housings, side lights, and grill in the reverse order in which you disassembled them (you can hate me now for describing this huge process in one sentence).
Next, we will do the wiring for the xenons.. Just as in the mockup, connect, the leads from each headlight housing to the appropriate connectors. Red and Black leads to battery. You can use conduit to make your install look cleaner. At this point, don't forget the rubber fittings that go on the back of the headlight housings. The bulbs are held into place by the little clips that resemble the metal of a paperclip.
The halos are connected to the little black inverters. They each have a red and black lead coming from them. I daisy chained mine, red to red and black to black, then connected the black to a solid ground on the vehicle. The red, we want to bring into the cabin through the firewall and connect to the drivers side fuse panel. I taped up the inverters with electrical tape to waterproof them more. You never know...
BTW Don't splice the inverter wires then touch them. They run at 900v and will make your arm do a little dance. Trust me. Not fun.... Trust me.
For this, use the 18G wire, some conduit to make it look pretty, and run the wire back to the fuse panel through the hole in the firewall. Use your little mini fuse tap and tap into a spot that is turned on with ignition, You might have to try a few spots to get it to work. Make sure you have 2 fuses in the fuse tap.
At this point, I had already turned off DRL in the FJ by disconnecting the grey plug on the driver-side behind the corner light there. There are many places that tell u how to do this.
.jpg)
Once everything is connected and replaced, use a long fucking phillips screwdriver and adjust beam height. If you look at the above photo, and at the left side (our left) of the housing, there is a tab that comes out to screw into the FJ with that silver screw. In that tab there is a hole. The adjuster knob is down through there, so put your long ass screwdriver into that hole and turn to raise or lower the beam. Line them both up so they are at the same height, and at a reasonable height to not blind anyone.
And that's pretty much it. All components can be purchased on eBay if something shorts out, such as inverters, the main wiring harness, halos, etc. And for pretty cheap I might add.
Here are some shots of my finished project. I added some DRL LEDS to the grill as well. I dis-connected the white halos sometimes for just showing the green.


Hey man, great write up! Just curious as to how well these have held up for you? I just ordered a set right after I found your blog. How long have you has them going for now?
ReplyDeleteAlso check http://projectoreviews.com/best-budget-projector-tenker-q5-vs-epson-vs250-vs-vivibright-gp100/
ReplyDelete